Blending Megascans Assets in UE4
Realtime technology has made it possible to create stunning landscapes in no time, but there is still no definitive way of creating a terrain and blending it with multiple objects. In this tutorial, we’ll explore the most common workflows to help you achieve just that, and talk about their pros and cons as well. This may get a bit technical, so sit tight and enjoy the ride!
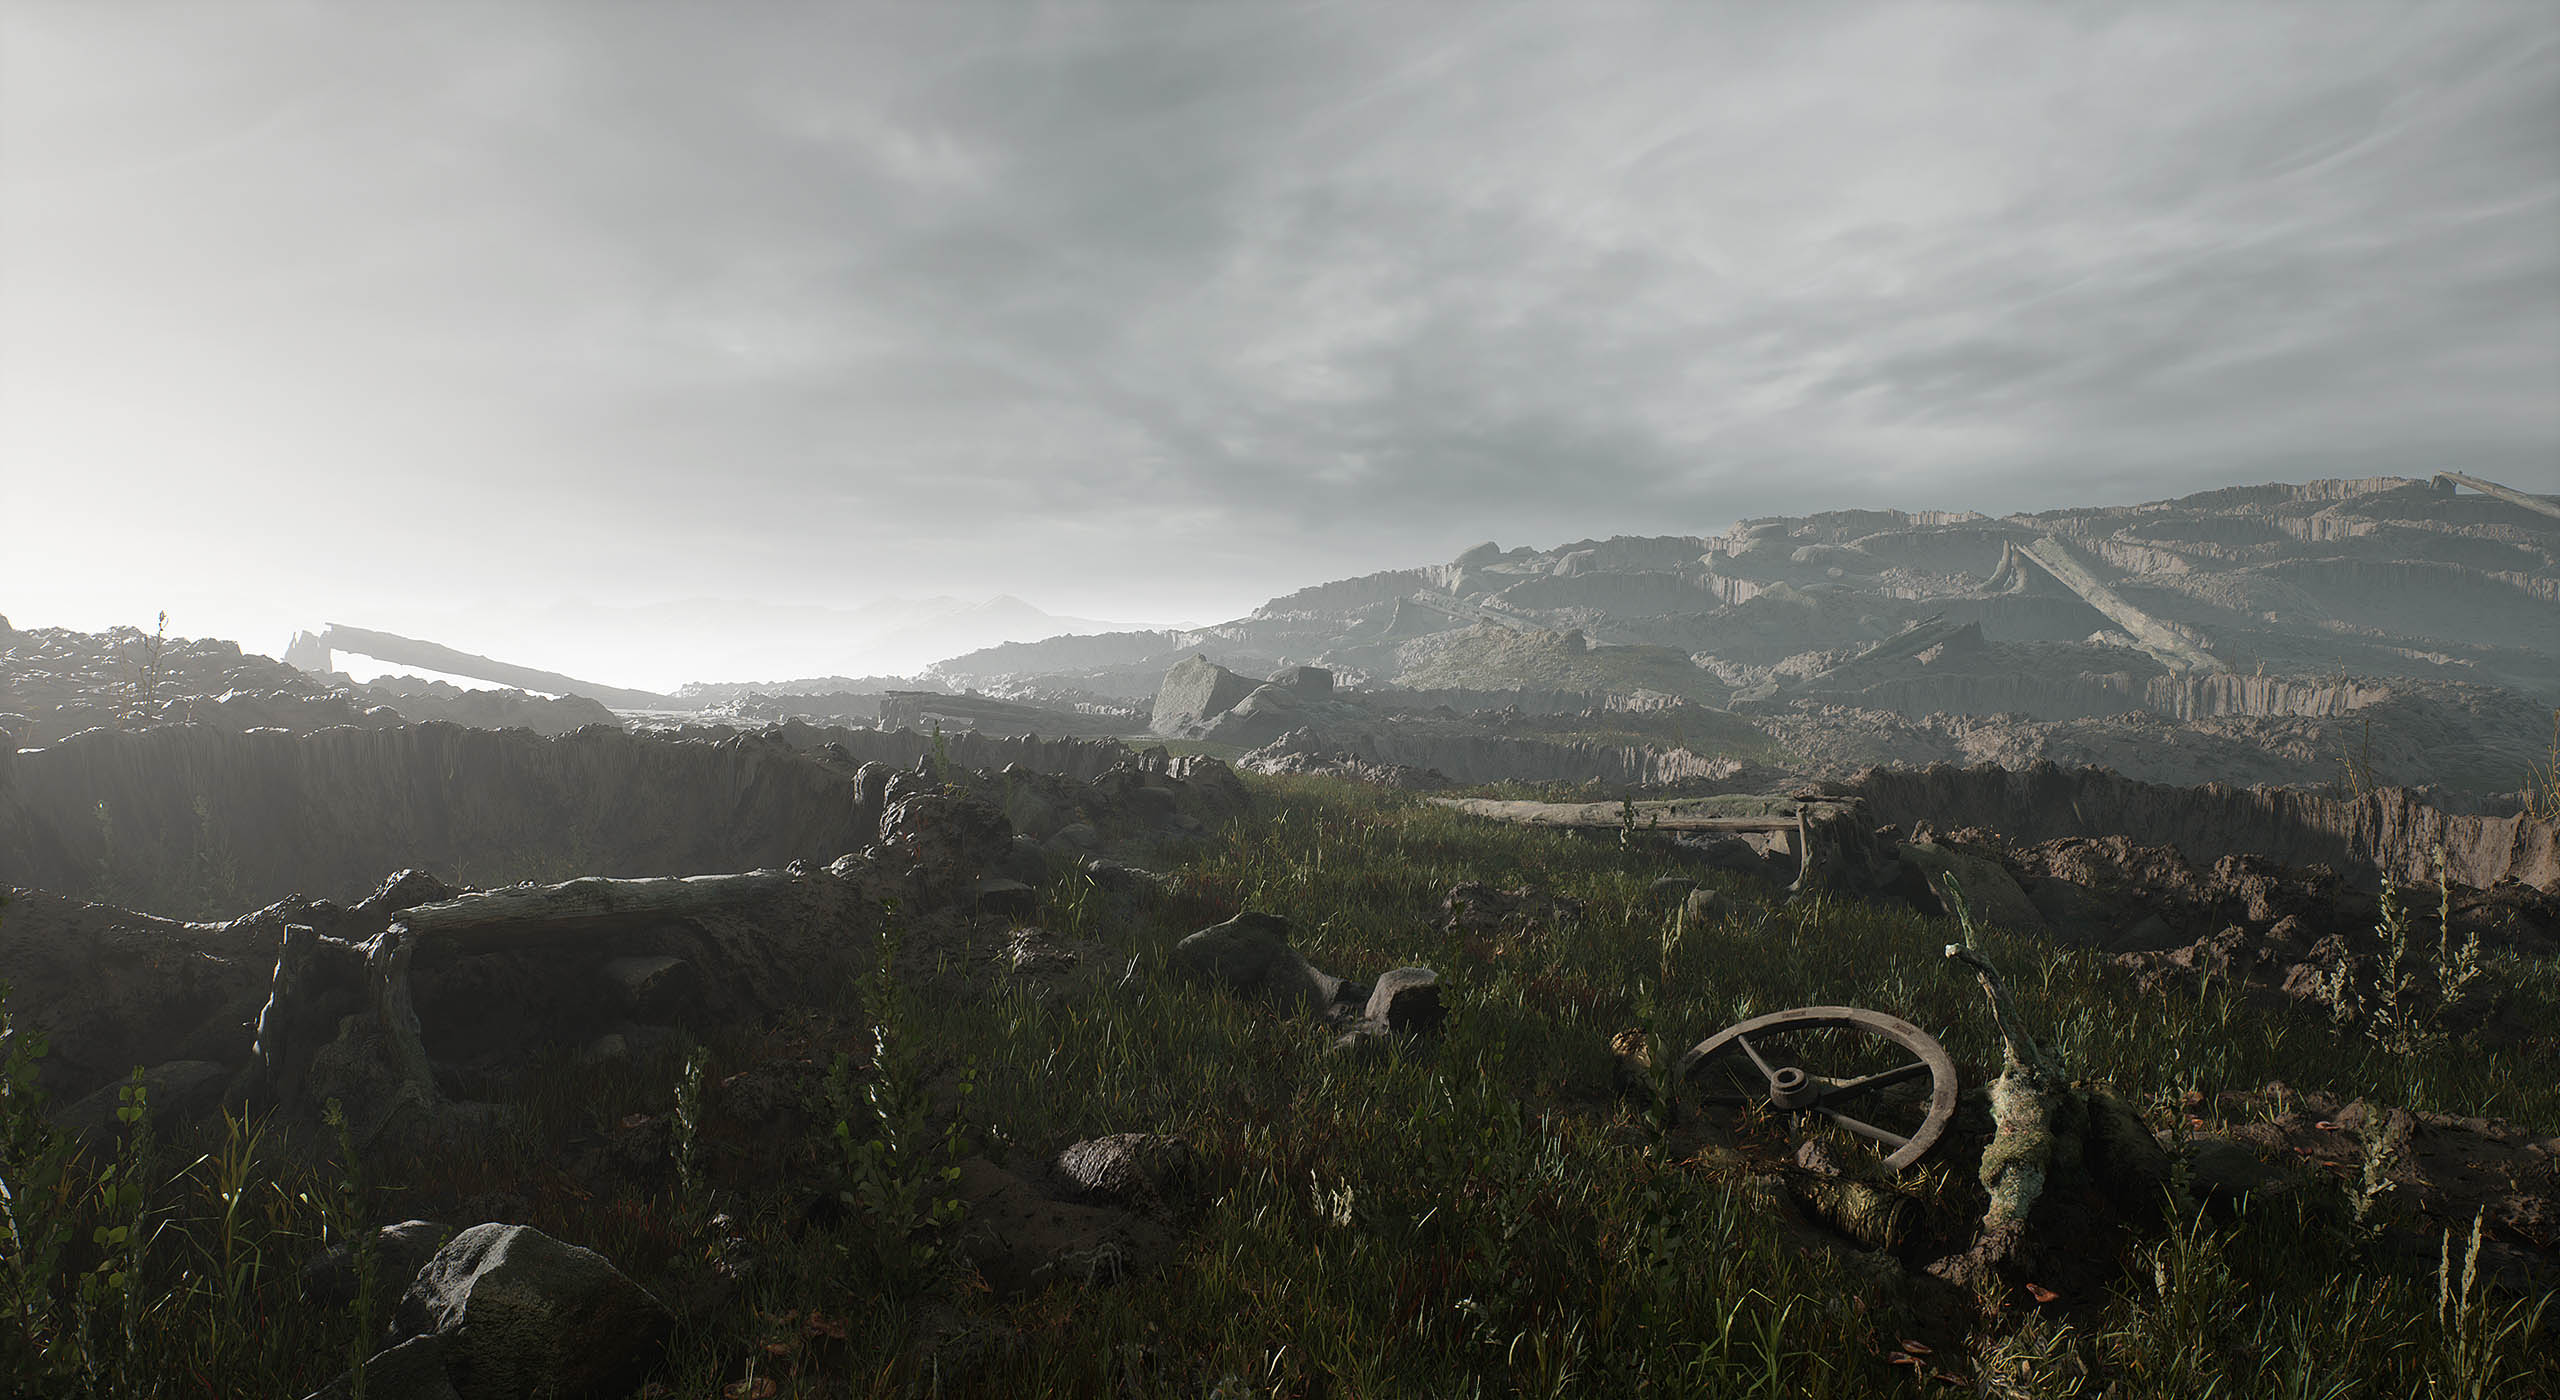
We’re going to make a simple field that has been battered by artillery fire. For this scene we’ve used the ‘Damp Soil‘, ‘Cut Grass 2×2 M‘, and ‘Grass Clumps‘. To get started, grab those assets.
We’ll cover the contents of this article in more detail on our livestream this Friday, January 24th at 7PM CET, so don’t forget to tune in and ask us all your questions!
World aligned texturing
The first method that we will be looking at is world aligned texturing, which is a form of triplanar mapping. The idea behind triplanar mapping is that you project a texture from the front, sides and top/bottom of your object, giving your texture seamless transition.
Source: Normal Mapping for Triplanar Shader
You can achieve a similar result by using Unreal Engine’s ‘WorldAlignedTexture’ (WAT) node.
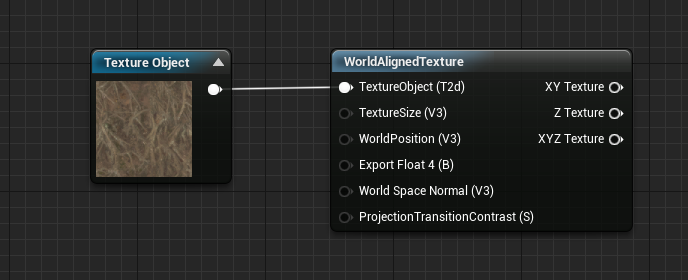
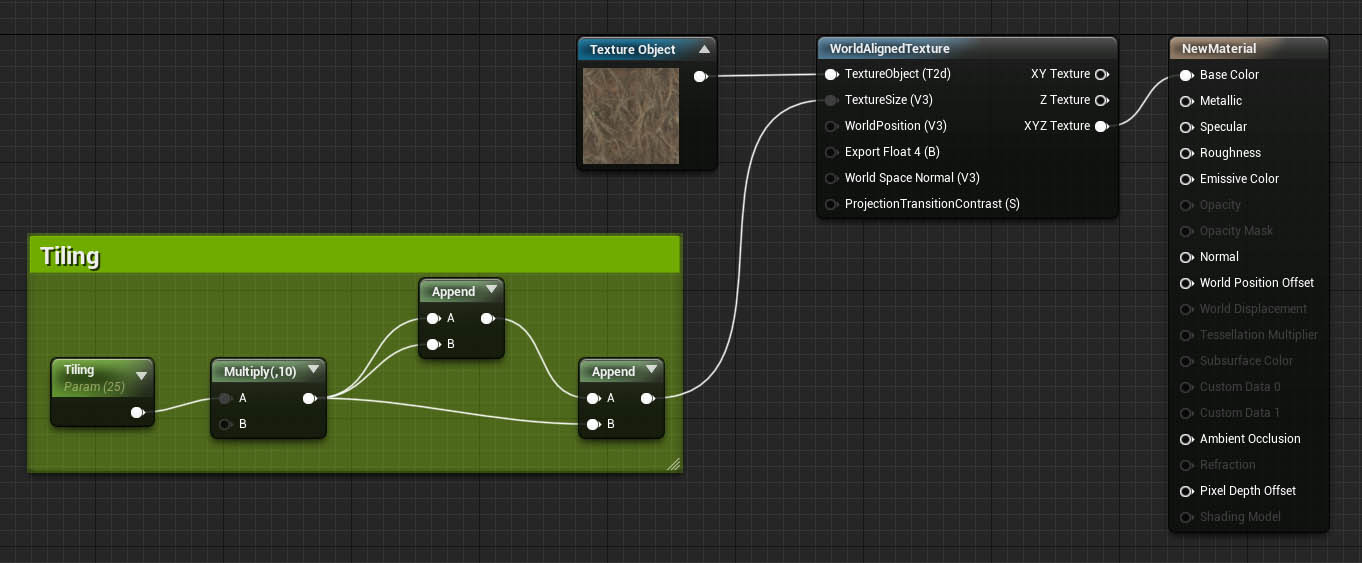
We want to feed a texture and a tiling parameter into our WAT node.
Create a ‘Texture Object’ node, and assign your texture to it. Then you need to plug your texture into the ‘TextureObject’ input of the WAT node.
You can control the tiling across all XYZ axes by creating a float3 vector like in the screenshot below.
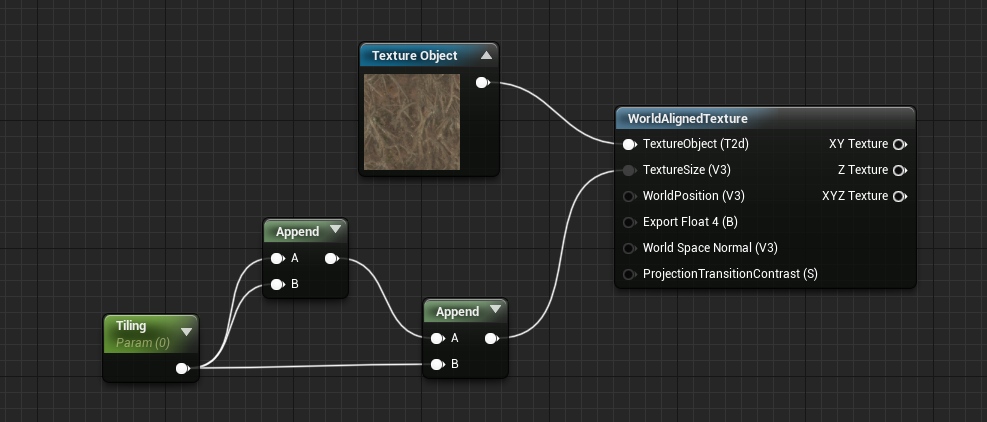
As a side note, if you want to control the tiling across each individual axis, just use a 3Vector node, which has 3 RGB parameters that can be used to control the amount of tiling for each axis.
This is what the end result looks like in action, when moving a sphere onto a plane:
Note: the sphere and plane have the same material applied to both of them
The material setup behind this GIF is incredibly simple:
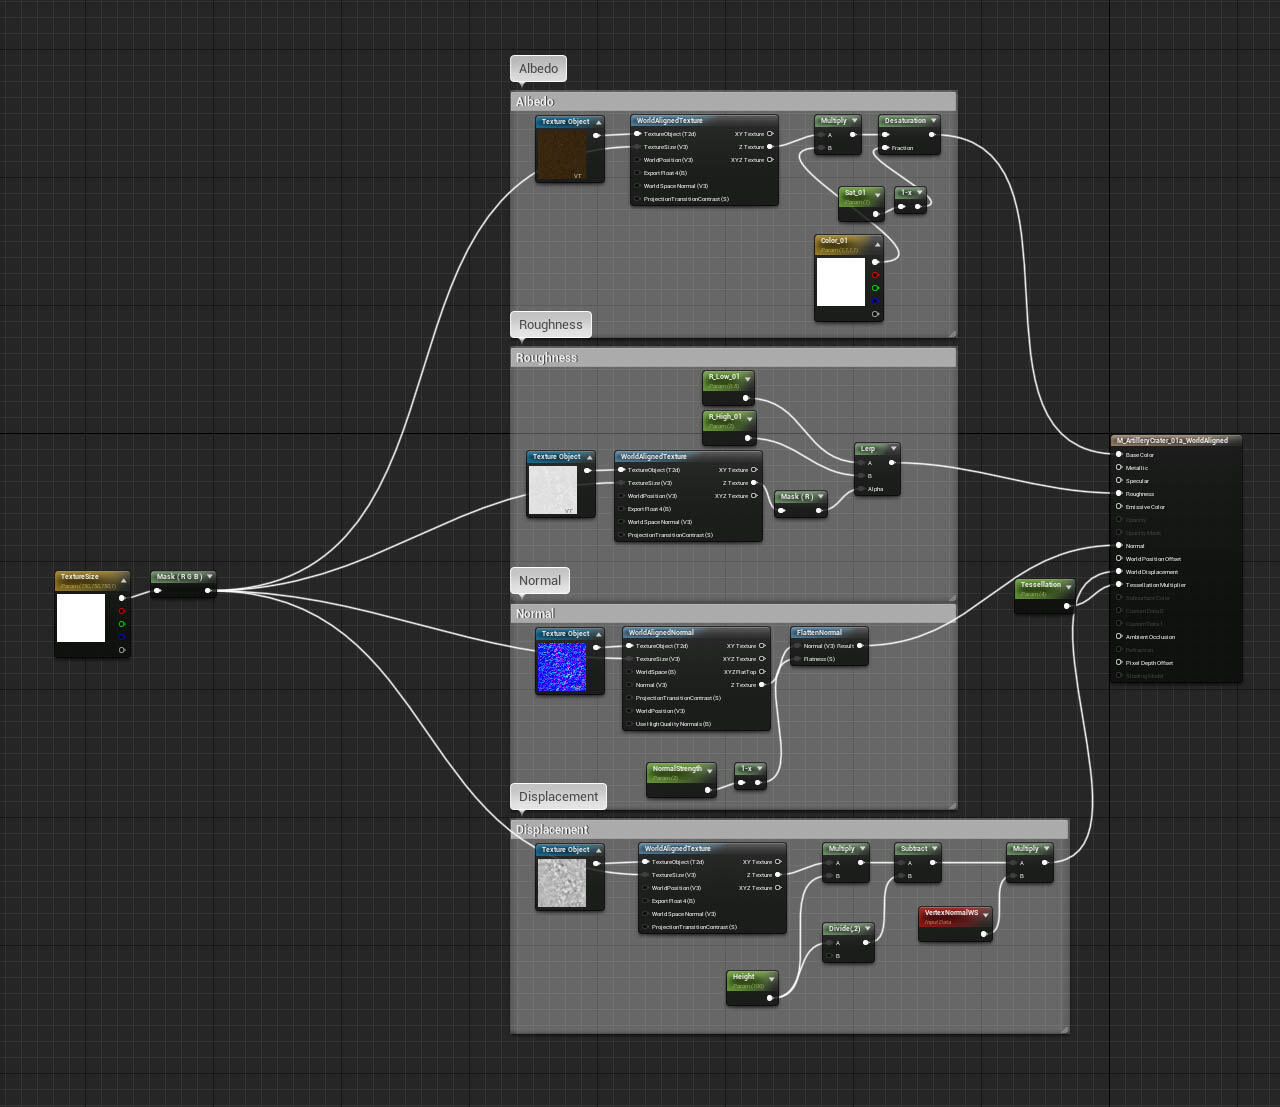
But here’s what a fully-fledged material PBR setup looks like when using this technique:
You’ve probably noticed in the GIF that the lighting transition from the sphere to the plane is quite sharp, and that’s unfortunately the biggest downside to this method. You could edit your geometry’s vertex normals, but that’s a much more complex workflow that requires an incredible amount of work.
If you’re fine with the lighting seam issue, then this technique can yield great results at no performant cost, especially when compared to other blending techniques.
Download the ‘WorldAlignTexture’ material setup: https://blueprintue.com/blueprint/101g7t_k/
Pixel depth offset
In the ‘WorldAlignedTexture’ setup, there’s a lighting seam issue whenever two objects intersect. One way of making that seam less apparent is the ‘Pixel Depth Offset’ (PDO) workflow.
The idea behind this workflow is to add dithering, which is an old technique used to create the appearance of a smooth gradient by using random noise values to simulate transparent and non transparent pixels.
To create a dithering effect, let’s add a ‘DitherTemporalAA’ node in our material, and multiply it by a constant value. The output of the ‘Multiply’ node then needs to be fed into the ‘Pixel Depth Offset’ input of the material node.
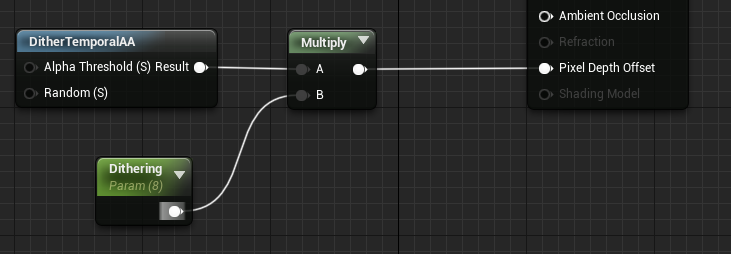
The end result is a really neat dithered transition between your terrain and any arbitrary object that might intersect with it.
Like all good things in life, this technique comes with a few drawbacks. The PDO setup works by pushing certain pixels from the camera, which results in fake transparency.
When set to a low value, the intersecting area (bottom of the sphere in this case) will progressively fade in, giving us the illusion of blending. But the higher the value, the more pixels get pushed further into the scene, which results in pretty bad artifacts on the geometry itself and the light/shadow accuracy.

While the Pixel Depth Offset offers many benefits, constraints like these should be kept in mind when working on a scene. The smaller the objects, the better the intersection.
Download the PDO material setup: https://blueprintue.com/blueprint/bwa_kbpc/
Distance field mesh blending

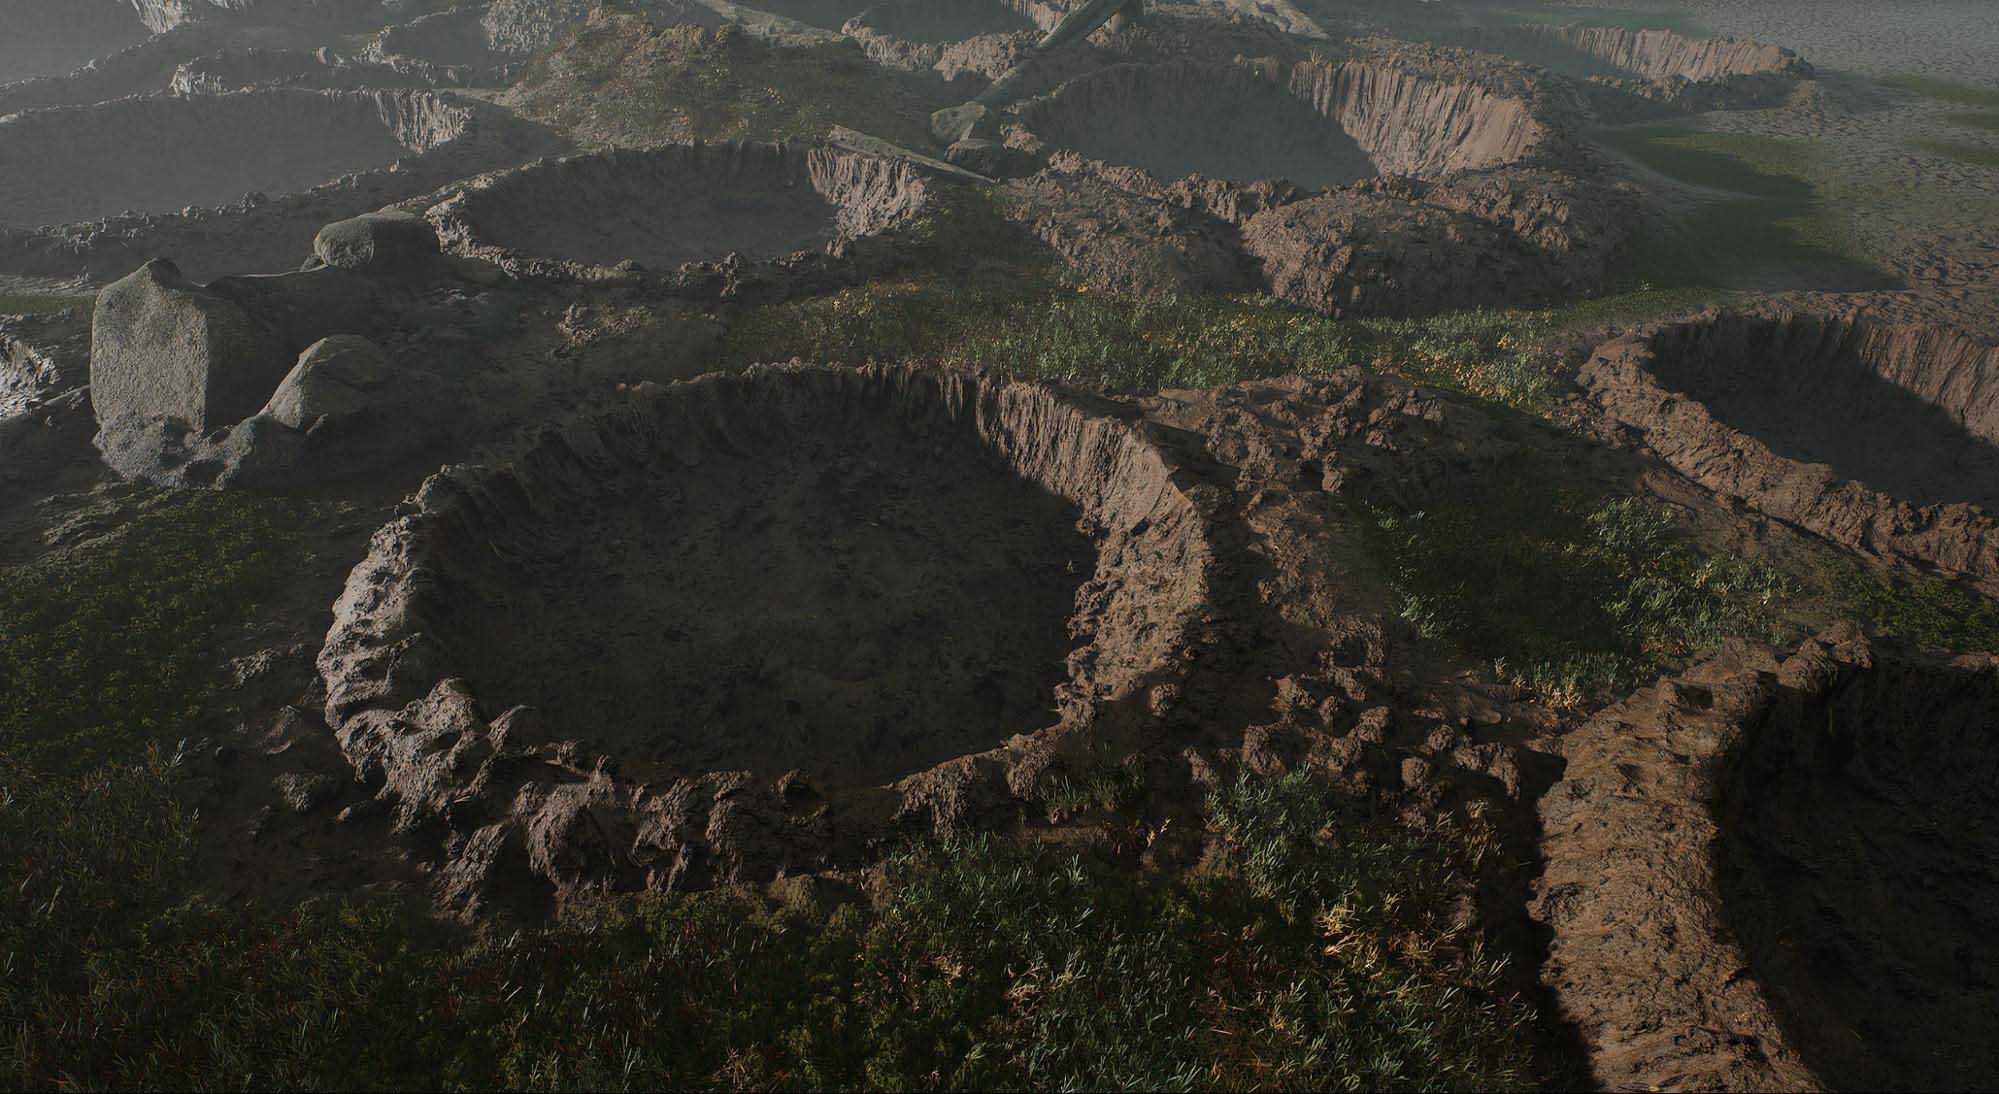
Perhaps the most promising of all, ‘Distance Field Mesh’ blending allows us to create realistic intersections by blending the lighting at any given intersection point, all without the aforementioned dithering issues.
This technique works by averaging the normals of our crater that intersect with the terrain, more precisely like this:
Distance Field blending requires a few more steps than usual to get them to work.
- First of all, you need to enable mesh distance fields by going into Settings > Project Settings, then type ‘distance fields’ in the search bar and make sure that ‘Generate Mesh Distance Fields’ is enabled:
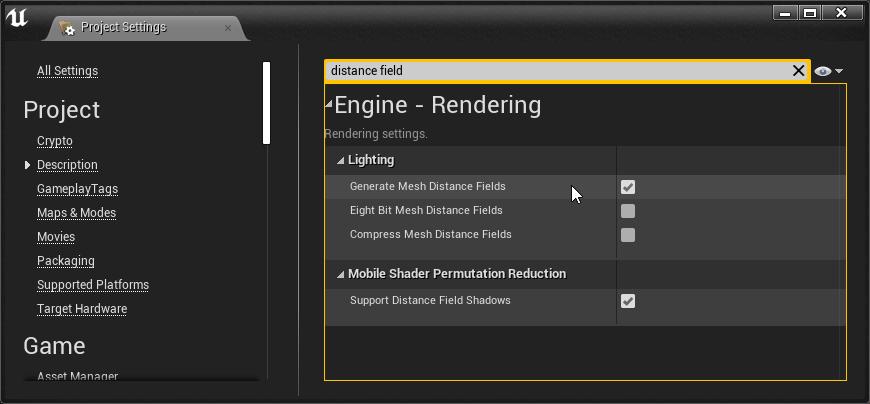
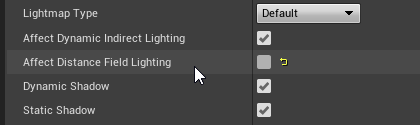
You’ll be prompted to restart Unreal for this to take effect. Do this now. - Next, you need to make sure that your meshes (the objects you want to blend into the terrain, not the terrain itself!) have the ‘Affect Distance Field Lighting’ option un-checked in the actor’s properties:
And that’s it for the project/mesh settings! Next we need to create a material setup that helps us control this effect.
The setup to replicate is the following:
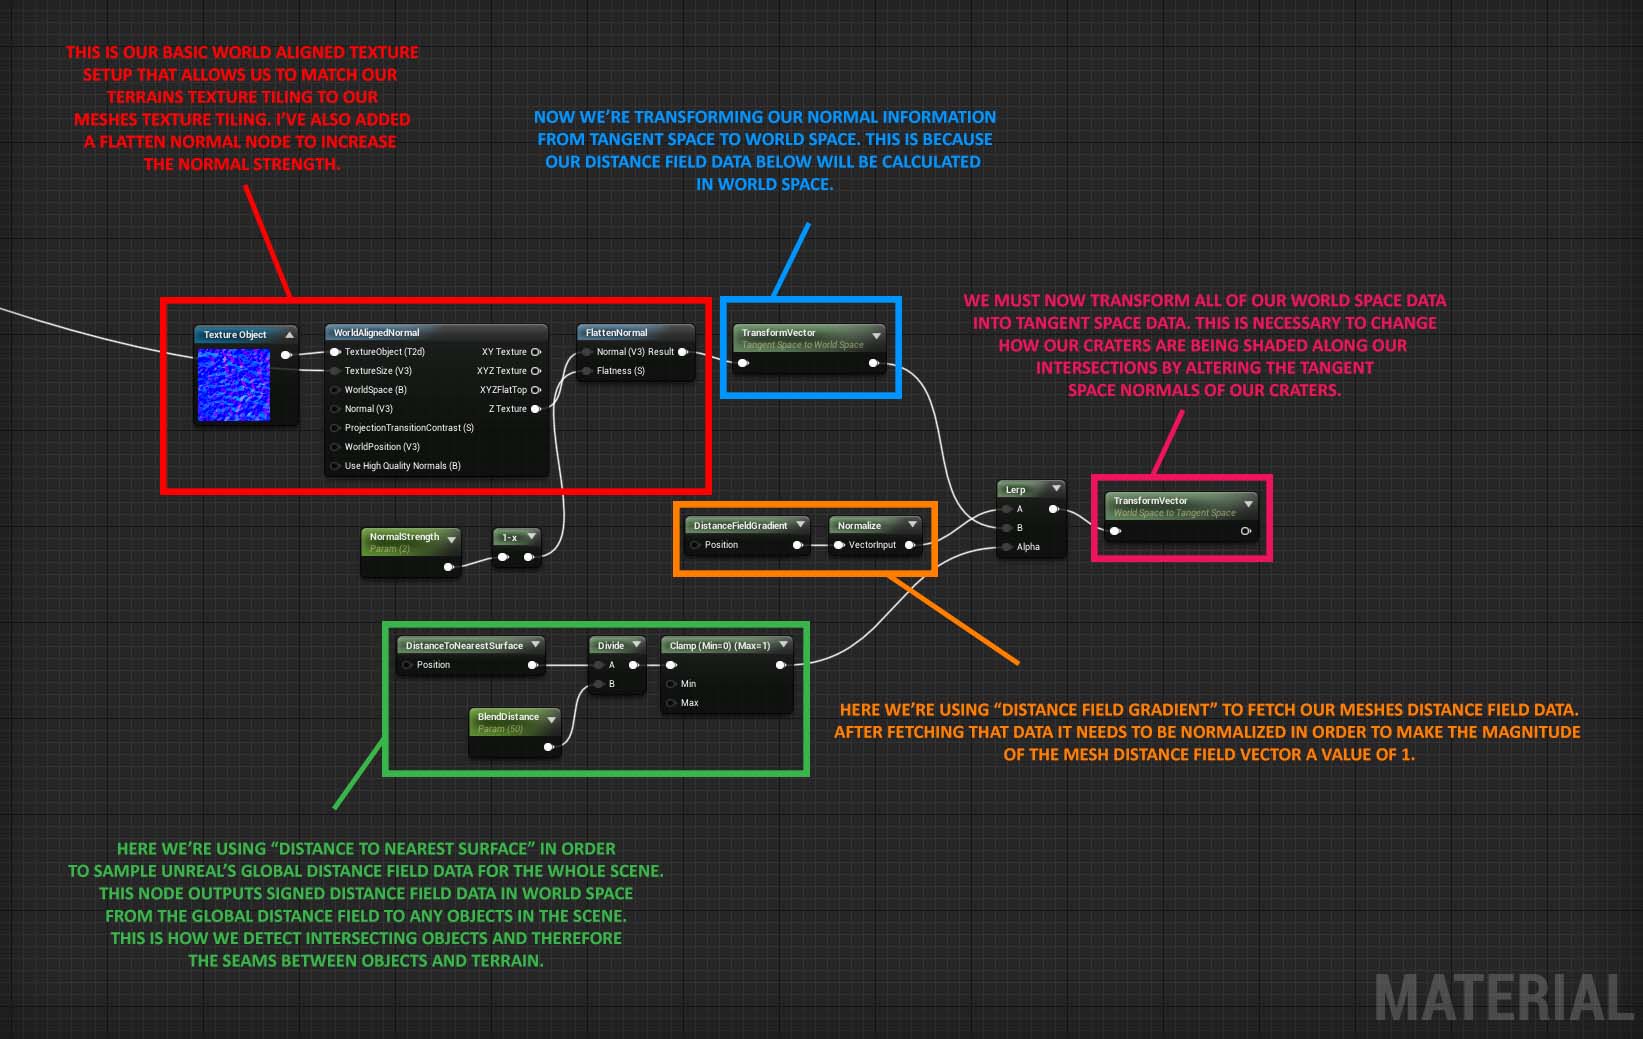
The output that you see on the right (highlighted in pink) goes in the Normal slot of your material node, and that’s it! You can control the blending intensity with the blend distance parameter.
Keep in mind that this workflow doesn’t blend the terrain and the meshes’ textures, it only smooths the normals of our meshes along the intersecting points on the terrain. In order to get the most out of it, you could use the ‘WorldAlignedTexture’ workflow on your meshes and give them a similar texture set to that of your terrain, which will help create a more realistic blending.
Since we have ‘Affects Distance Field Lighting’ disabled, using this technique means that you won’t have access to ‘Distance Field Ambient Occlusion’ or ‘Distance Field Shadows’ on meshes with that parameter disabled, so do keep that in mind in case you’re using those effects.
This technique is also quite expensive, and not recommended for production unless you really know your project’s performance budget. But for portfolio needs it can do just fine, and truly gives an edge to your open environments.
Link to material download: https://blueprintue.com/blueprint/bqo9vg8i/
Runtime virtual texturing

The last option we have available to us is a relatively new feature and will likely be the solution many of us will go to for our mesh blending needs as the feature is stabilized and expanded upon.
‘Runtime Virtual Texturing’, or RVT, uses the GPU at runtime to generate texel data on demand. This is especially useful for large areas such as landscape shading.
This method requires a few more steps than Distance Field blending but the process is fairly straightforward:
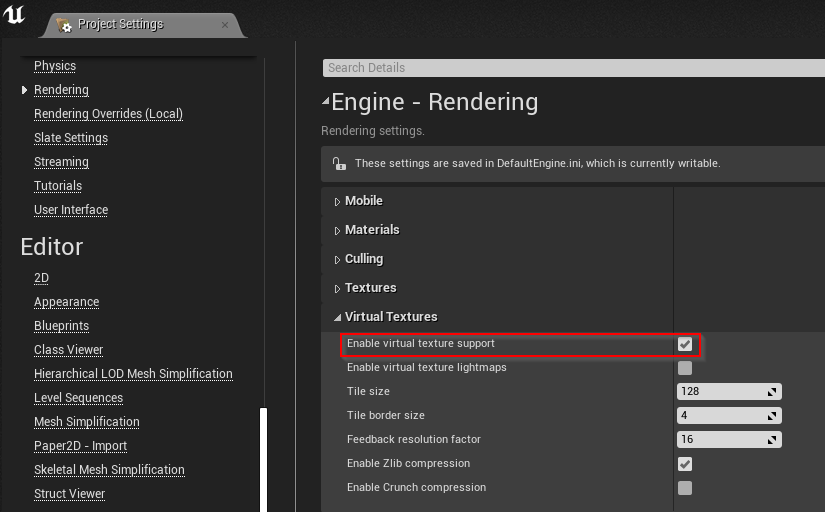
- First, enable ‘Virtual Texture Support’ in the project settings under ‘Engine/Rendering’. This will make all future texture imports default to a ‘Virtual Texture’ type, so do keep that in mind. The Megascans Integration converts the textures to their default texture type automatically for you in this case.
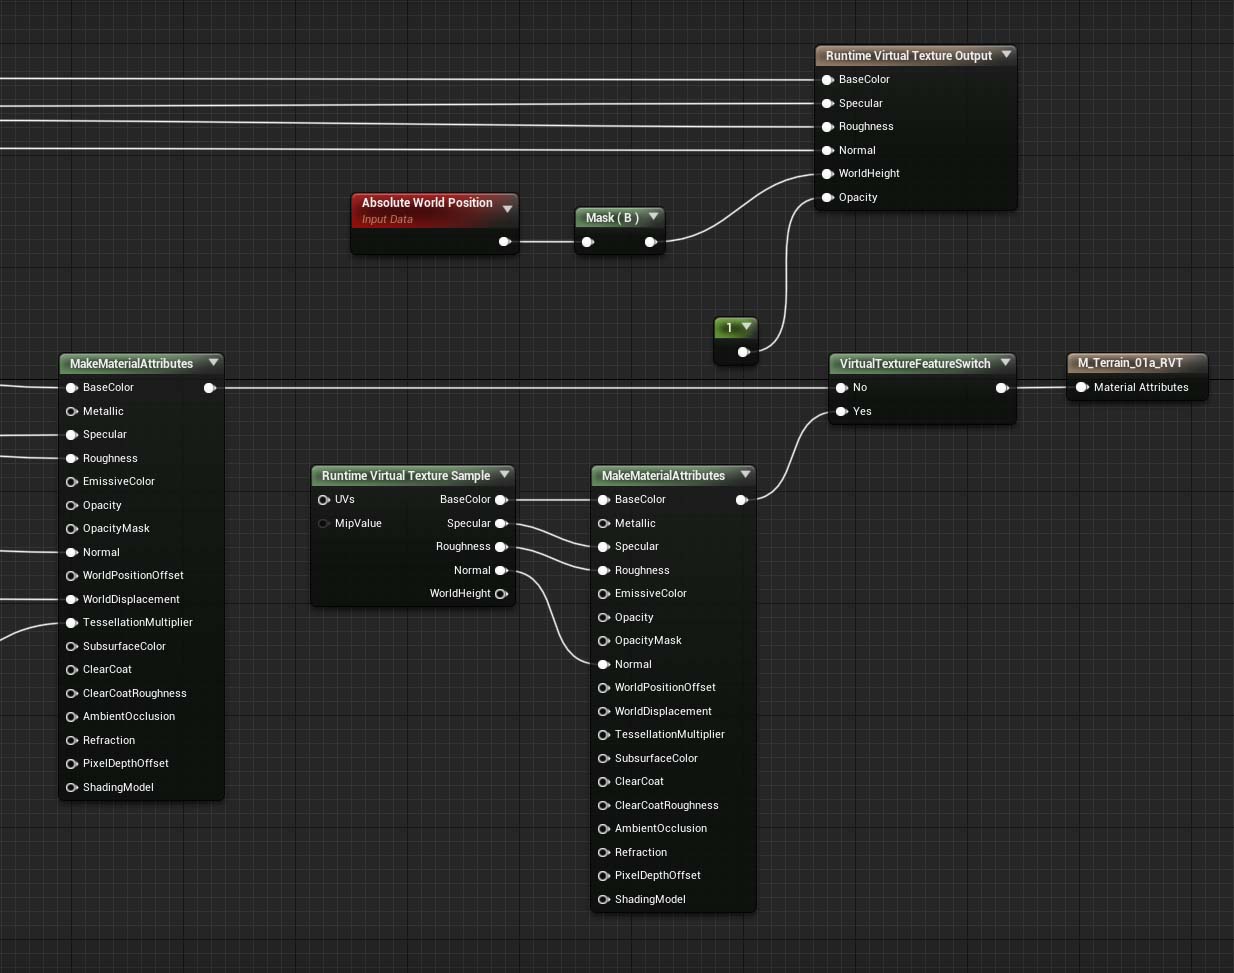
- In our terrain material, let’s create a ‘Runtime Virtual Texture Output’ node and let’s route our basecolor, specular, roughness, normal, and opacity to it. Place an ‘Absolute World Position’ node down and route this through a component mask with the blue channel checked. This gets plugged into the ‘World Height’ pin of the RVT Output node, which gives us all of the necessary information from our terrain.
- Let’s create an RVT in our content browser next. Right-click, navigate to material and textures, and there you’ll find ‘Runtime Virtual Texture’. Click that and name it to something convenient.
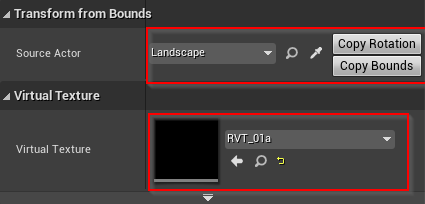
- Now let’s add a Runtime Virtual Texture volume to our scene. In our details panel for the RVT we just added, we need to add our source actor (our terrain) and our virtual texture that we just created in the content browser. First, let’s get the source actor by clicking on the dropper and selecting our terrain component. Next, let’s add the RVT we made earlier into the virtual texturing slot. Finally, click ‘Copy Rotation’ and ‘Copy Bounds’ to make sure the volume inherits the terrain’s dimensions. If you need to manually scale the volume, do so at this time.
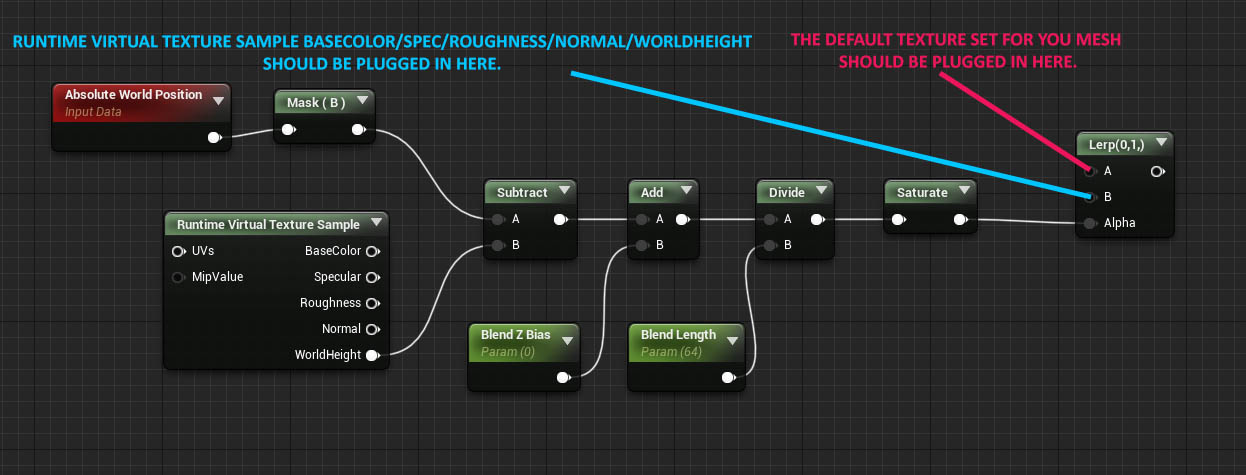
- Like with Distance Field blending, we need to generate an intersection between the mesh and the terrain. Let’s start by looking at our crater material again. The setup we’re going to use is an intersection blend using RVT ‘World Height’. This is exclusive to 4.24, so if you’re using 4.23, you won’t be able to achieve this. To achieve a gradient intersection for our blend, we need to subtract our absolute world position in the Z axis of our object from the ‘World Height’ of the terrain RVT. After this, we can modulate the result however we want, but in this example, we’ll want to blend between color, roughness, and normals to achieve the best look for the scene.
- Next, we want to disable tangent space normals for both the terrain and object materials so that we don’t have a harsh lighting seam.

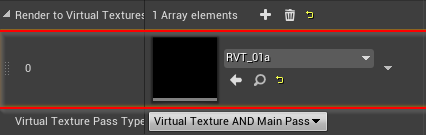
- And finally, let’s enable ‘Virtual Texture’ in our terrain properties. Click on the terrain component and under the ‘Virtual Texture’ section, add an array element by clicking on the + button, then set it to the RVT that we’ve made in the content browser earlier.
The RVT workflow gives you a natural look to your blending area, and the technique isn’t very expensive to render either.
Once displacement becomes supported, this method will be just as good as Distance Field blending, without the performance cost.
When painting on your terrain, you’ll notice that this workflow automatically projects the painted texture data onto your 3d objects as well.
Link to material download: https://blueprintue.com/blueprint/md12pcb5/
Conclusion
Asset blending is still an uncharted territory that’s ripe for experimentation, and while techniques like RVT are paving the way for better quality/performance workflows, it’s important to use the right technique for the right job (mobile game ? portfolio piece ? etc..) still.
Distance Field blending represents the current highest quality and most expensive workflow, and World Aligned Texture blending gives you a fairly cheap solution, but with quite a few technical limitations.
We’ll be talking about these techniques more extensively in our livestream this Friday at 7PM CET, so don’t forget to tune in and bring your questions with you!