Creating a Terrain Path With Unreal Engine’s Blueprint
Introduction
In this tutorial we’ll go over a fairly common workflow for making a procedural spline blueprint in Unreal Engine 4 to make drawing out roads and paths a walk in the park. We’ll go over making our base path mesh in Maya, creating our blueprint, and how to use the blueprint in a simple scene.
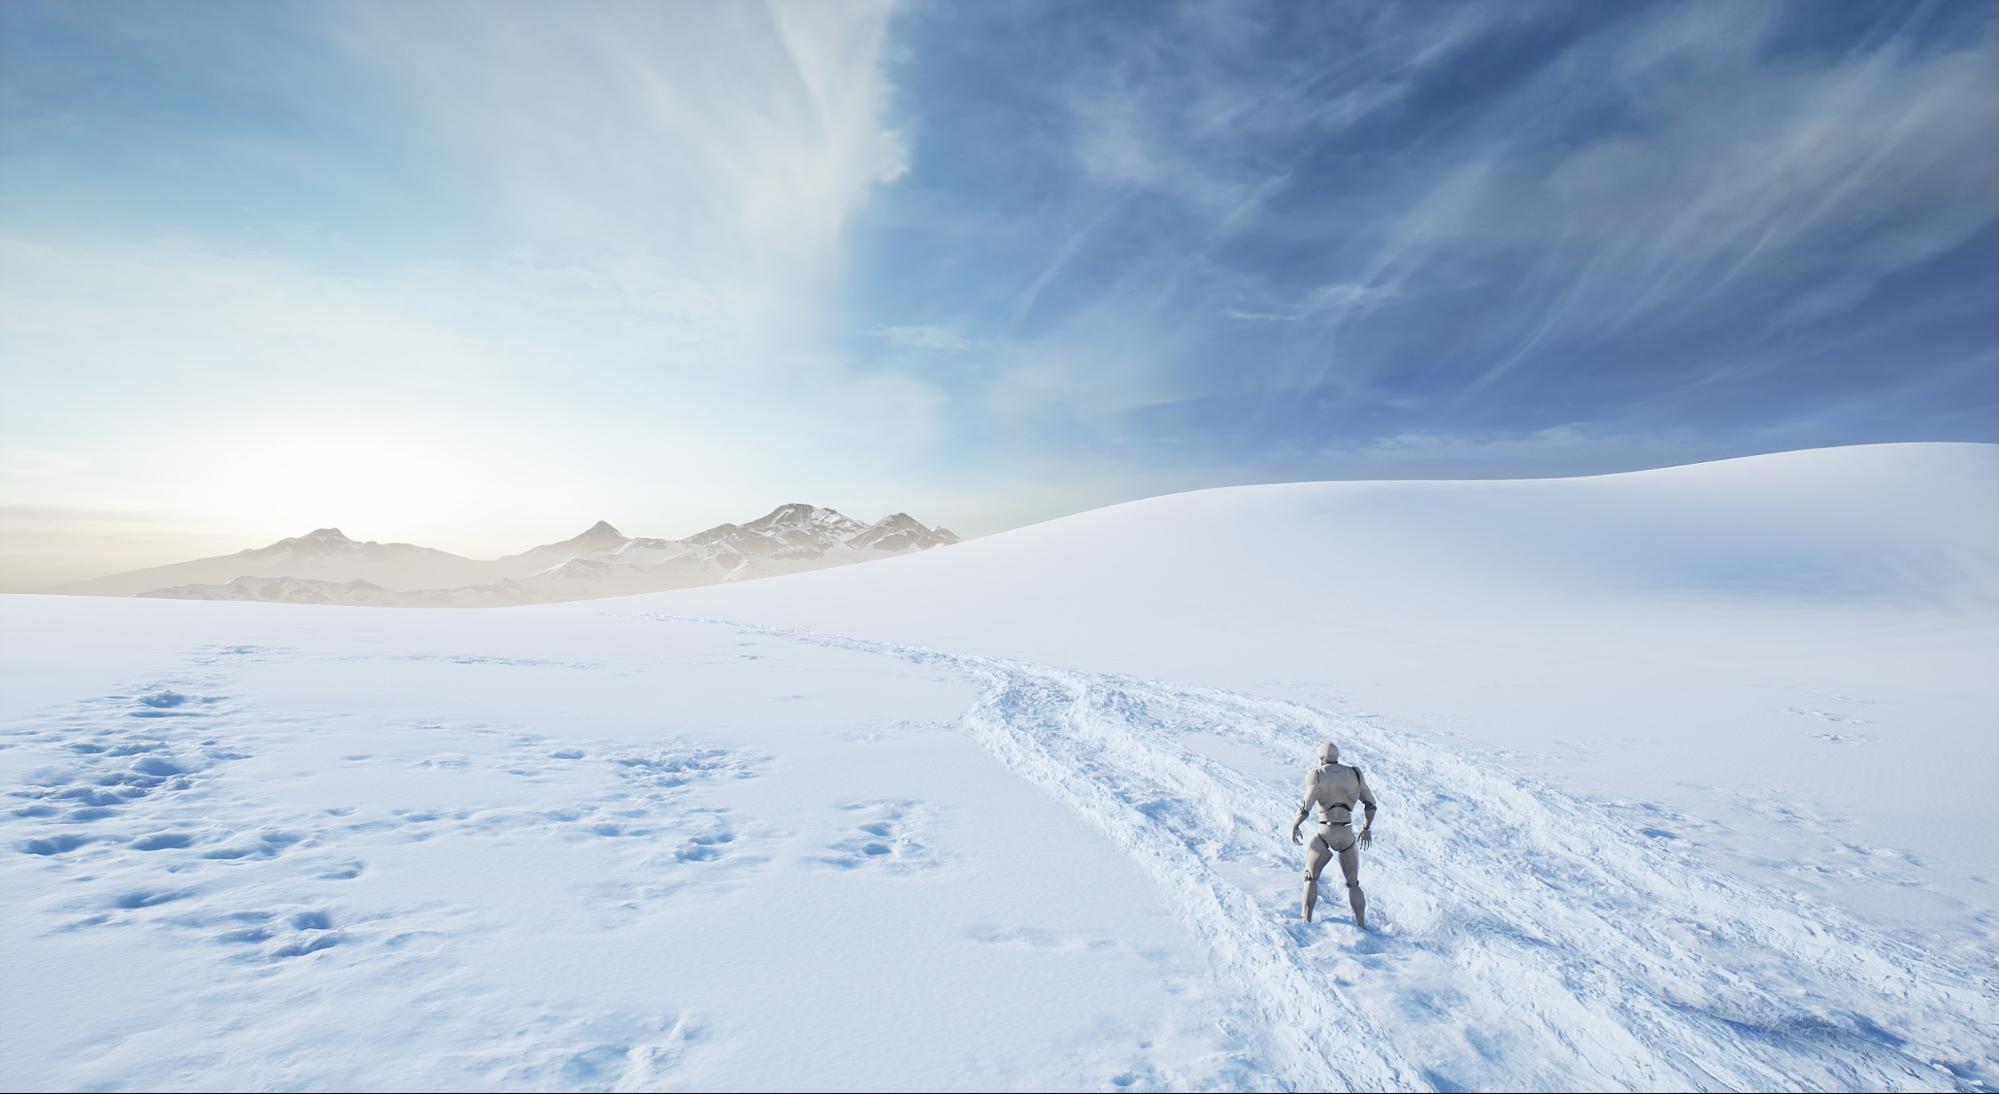
In this example we’re going to make a simple path through the snow. For this scene we’ve used the Deep Dirty Trampled Snow 2×2 M, Dirty Snow 2×2 M, and Fresh Snow 2×2 M. To get started grab those assets.
Before we begin, keep in mind that while paths can be vertex painted on the mesh, doing so generally translates into fairly generic paths as the vertex painting doesn’t have any directional flow like a normal path. Blueprint’s spline editor gives us just that, so with that said, let’s get started!
Modeling the base path mesh
The modeling of the base path mesh is fairly simple, but there are a few things you should consider before getting started: What kind of path or road are you trying to make? Are there established metrics for the size of the road? What should the shape and profile of the road look like? These are all questions you should be asking yourself before you begin.
In our case we need to make a mesh that’s approximately 1×1 meter, and it needs to have enough subdivisions to support deformation. I’ve found 8×8 subdivisions to work perfectly.

Now that we have the correct number of subdivisions we’re going to modify the height of the mesh to make it resemble a low poly path in the snow. We’re going to make the outer edges bulge upwards as if the excess snow has piled up and spilled over. The center will be sunken, as the path has been used so often that it has compacted the snow. During this process add edge loops as you need to make sure you have even topology.
Now that our mesh is ready we need to UV it. This is a very simple process, but it’s important to UV your path or road mesh in a way that it tiles vertically; it doesn’t need to tile horizontally. Usually a planar projection from the top, filling the 0-1 space will do the trick.
Now that we have our base mesh, let’s bring it into Unreal Engine 4 and begin working on our blueprint.
Creating the blueprint
The first thing we need to do is import our static mesh that we made in Maya. Now let’s create our blueprint. Right click in the content browser, make a blueprint class and select ‘actor’. Open the actor and navigate to the construction script. Here we’ll generate the material we need to make our spline blueprint.
What we’ll do first is to create a spline component under the ‘DefaultSceneRoot’ in the component tab.
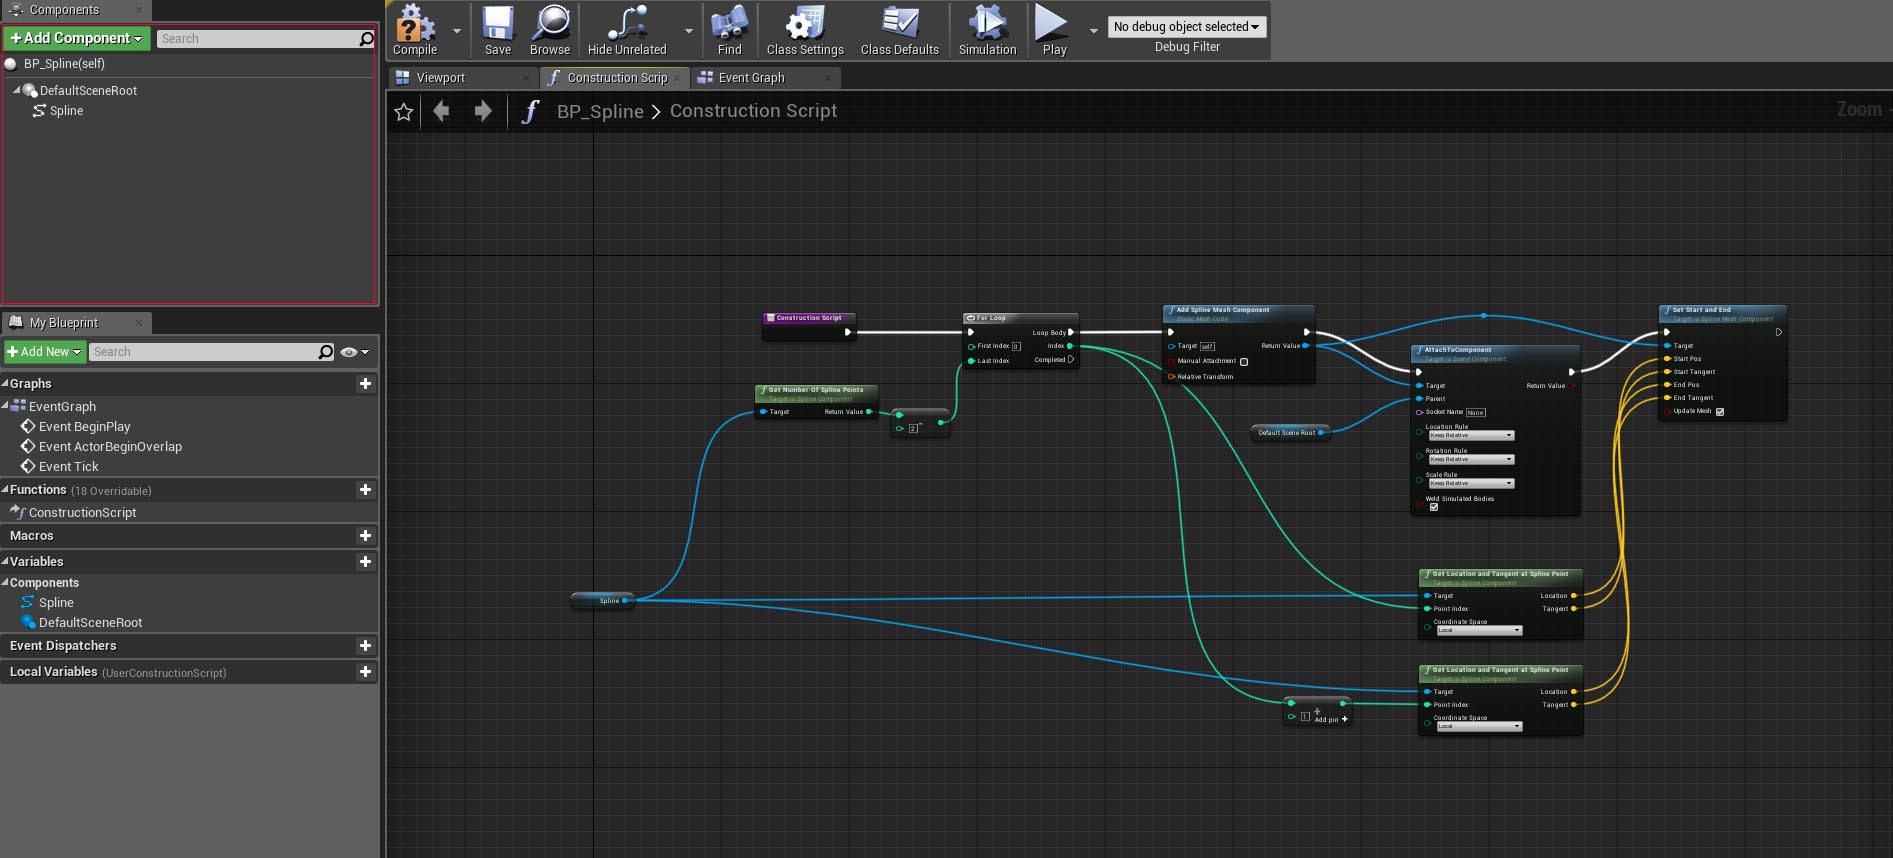
After that’s done, you can click the Spline text and drag it into the graph to get a reference to it. The next step is to right click in the graph and type ‘Get Number of Spline Points’ which does exactly what the name of the node says.
A spline can be thought of as a line with a defined start and end point, with multiple points in between. So this setup will allow us to define those start/end points and add more points by using a loop, which cycles through our index values (our points, in this case) and as a result adds more meshes to the spline.
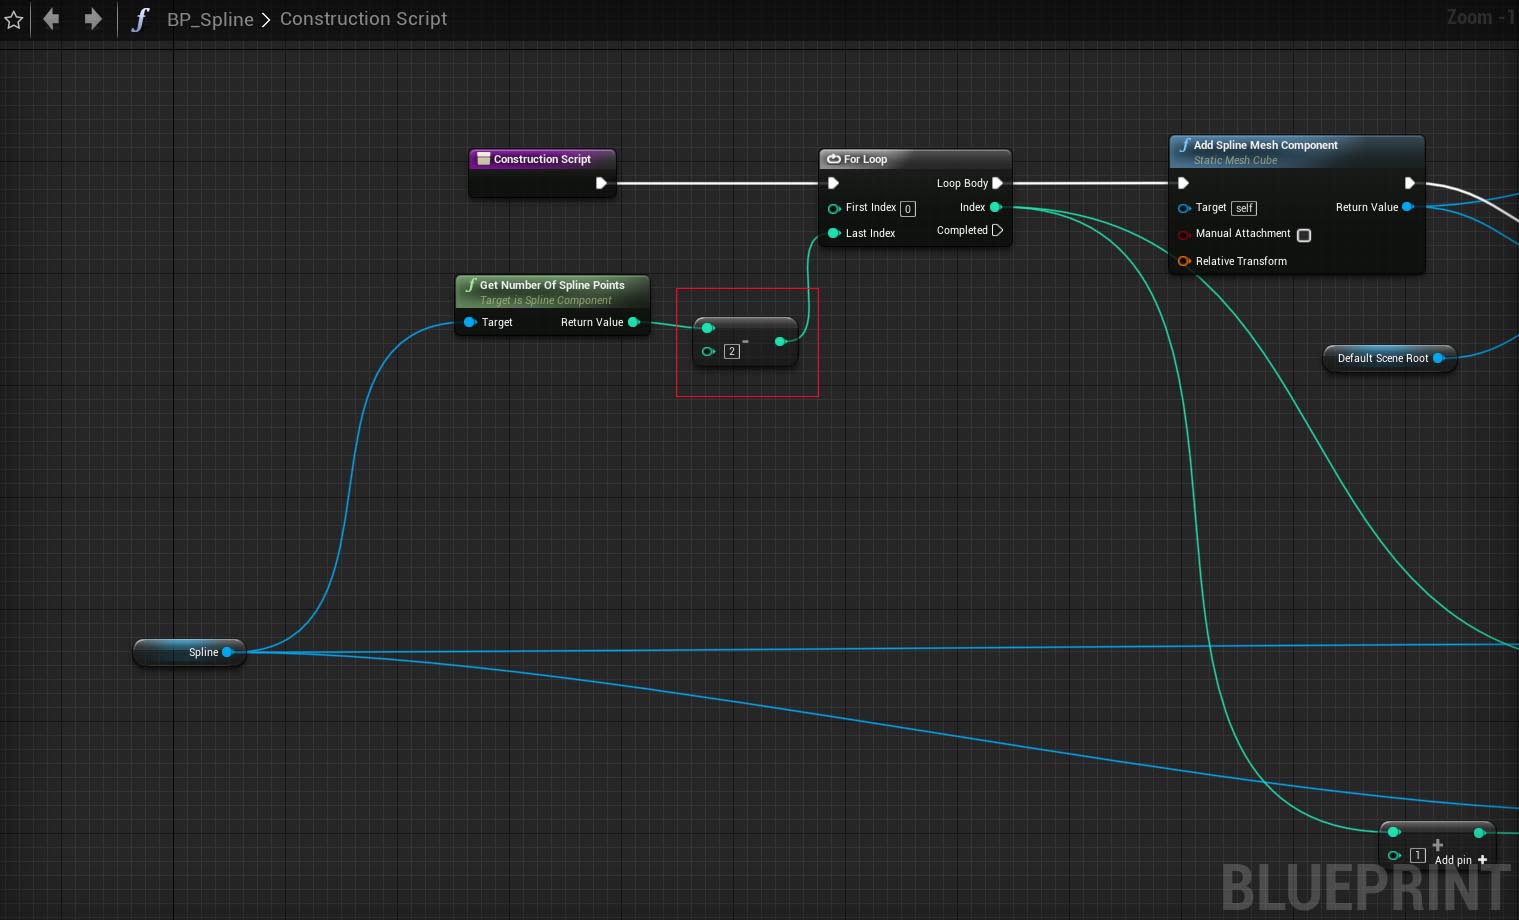
Initially, the spline will have two points for a single mesh, but a third point will be added between the first and second once you extend the spline, which creates a secondary mesh, and so on.
Next we’ll want to drop in a for loop node and an integer subtraction node, making sure that it’s integer – integer. We’ll subtract 2 from our last index value as we want to later define our start and end points in the spline code.
The output from the For Loop will split into two paths, though they use the same node, which is ‘Get Location and Tangent at Spline Point’. This node allows us to deform and move our spline points in the game world, so make sure these are both set to local space in the node. The top path will be the starting point of the spline, and the bottom will be the end point. Make sure to place an integer + integer node as this helps us add points to the index value whenever we edit the spline in the game world.
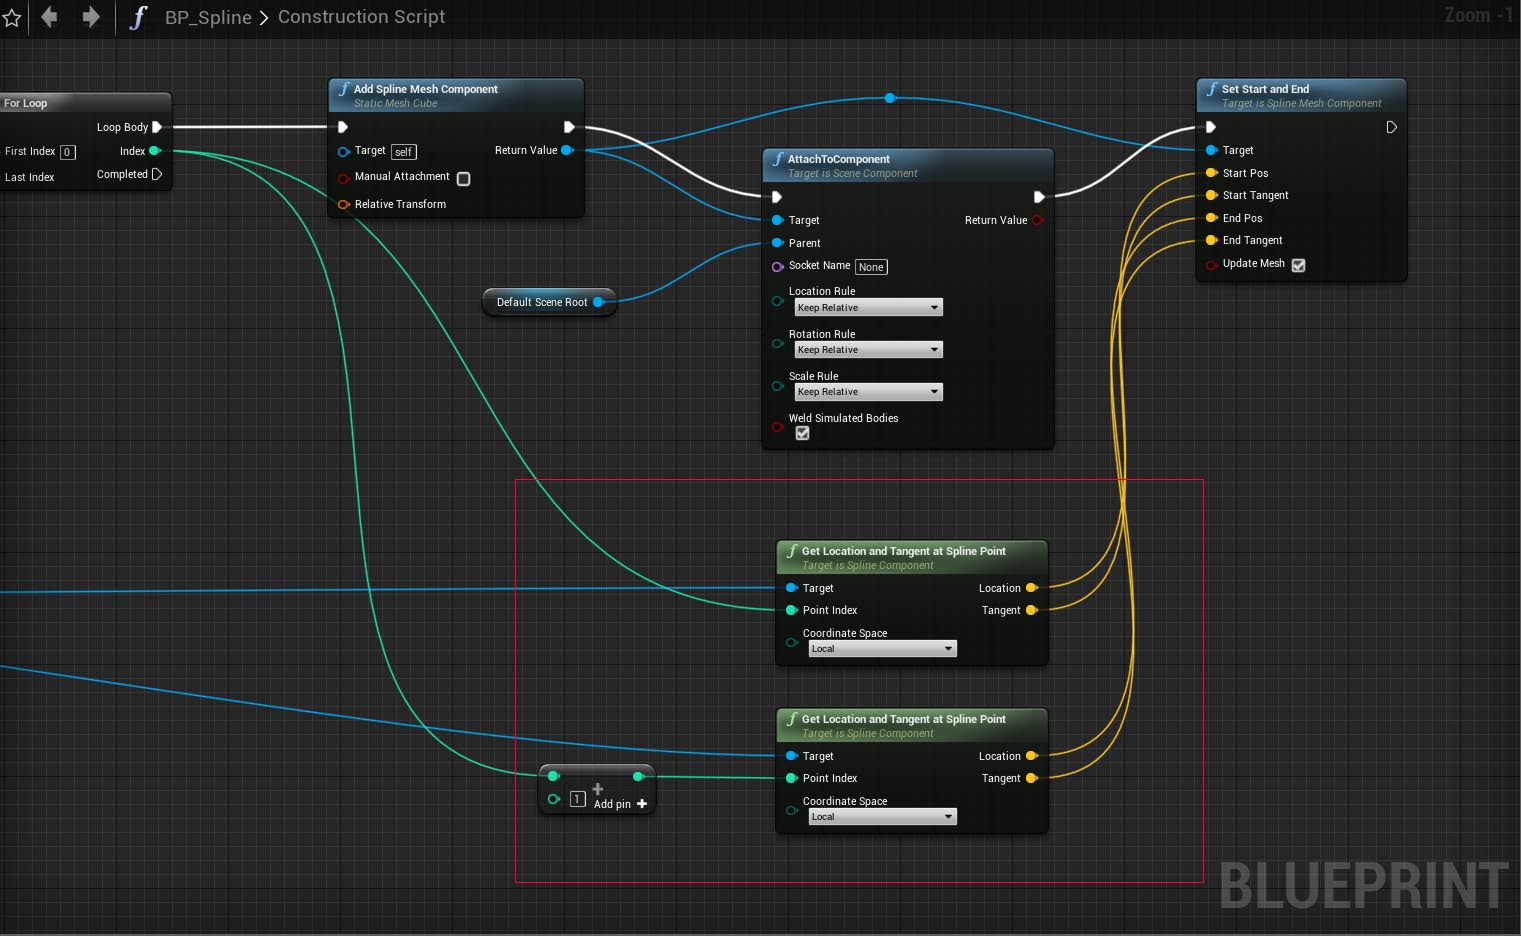
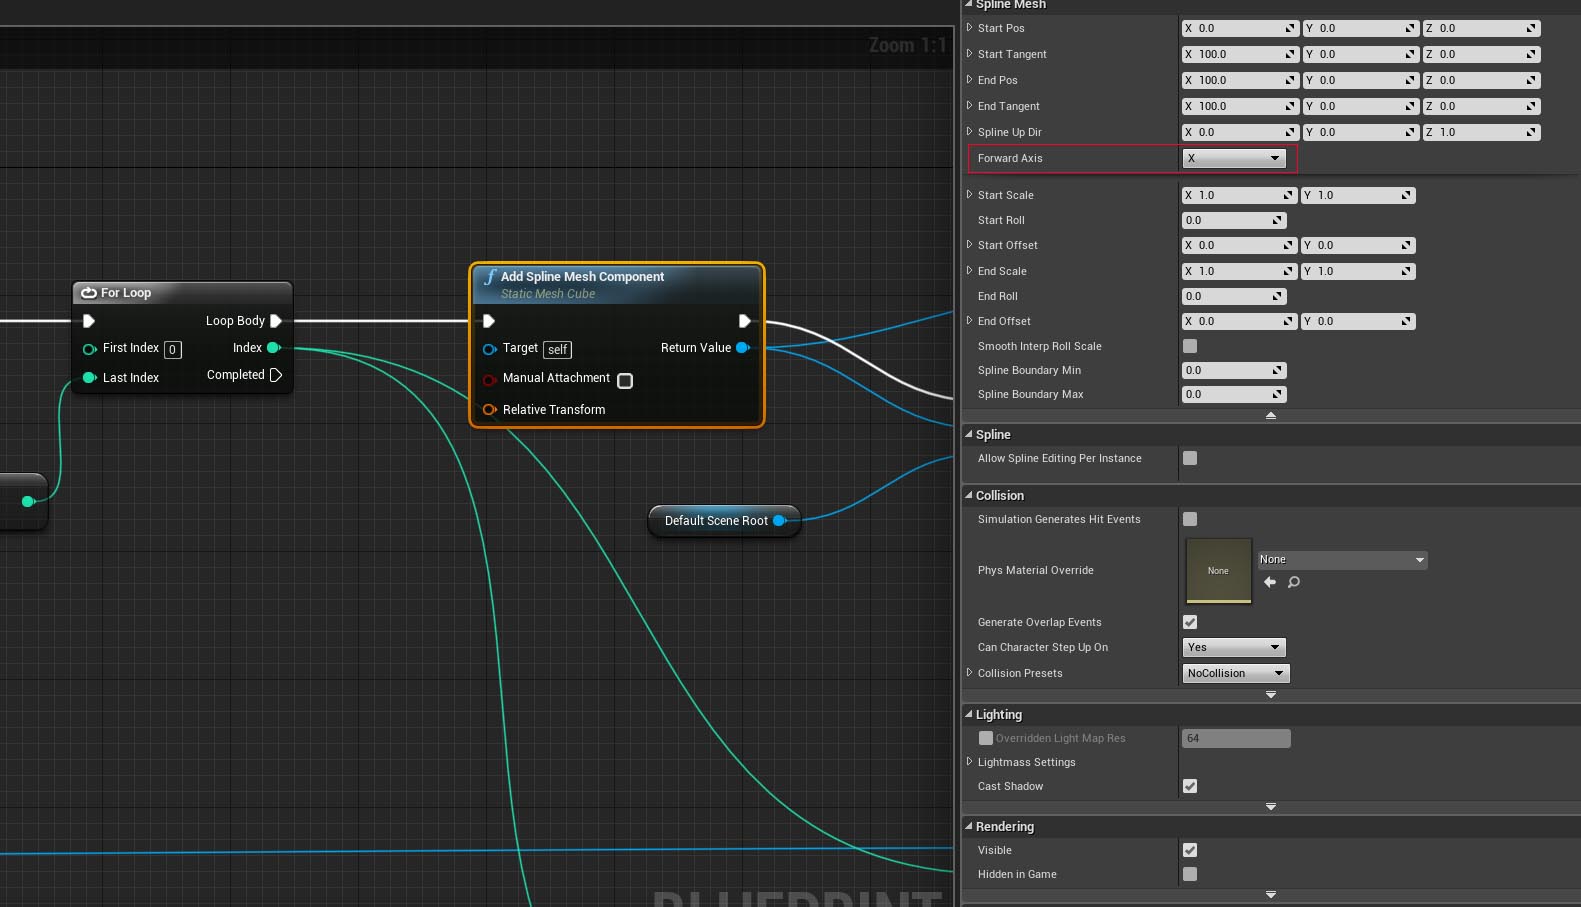
Up next, we’ll place down an ‘Add Spline Mesh Component’ node as this is where we want to set our mesh actor, material and vector that we’ll use for forward direction.
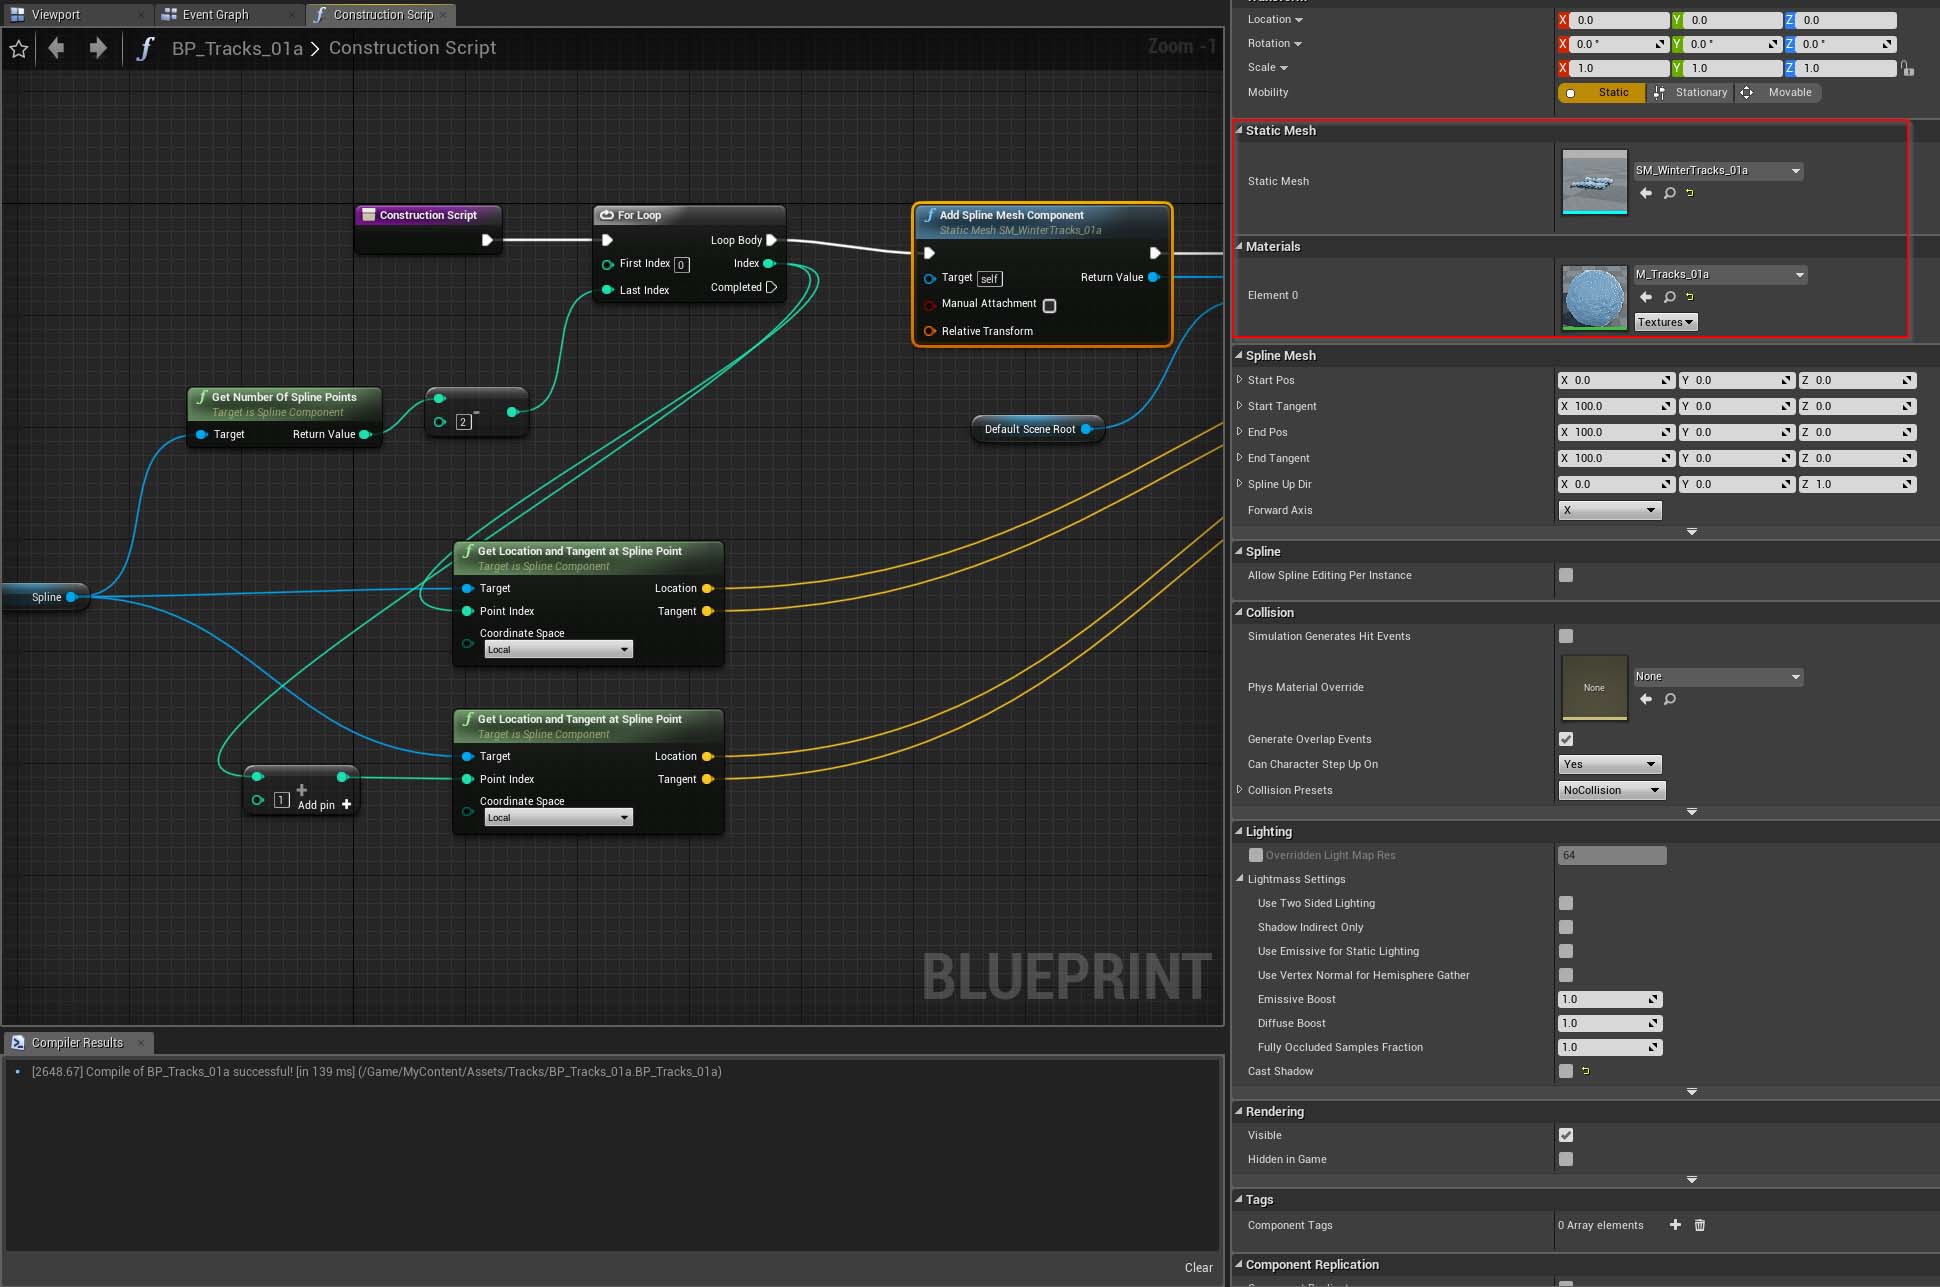
To set your forward vector/axis, look underneath where you set the mesh/materials. You don’t need to enter anything into the position/tangent or anything else, just the direction. For roads this should be set to the X axis so that we can extend the road spline out forward in your scene. Make sure your mesh mobility is set to movable as well, as the actual shape of the mesh may change when deforming and placing your spline.
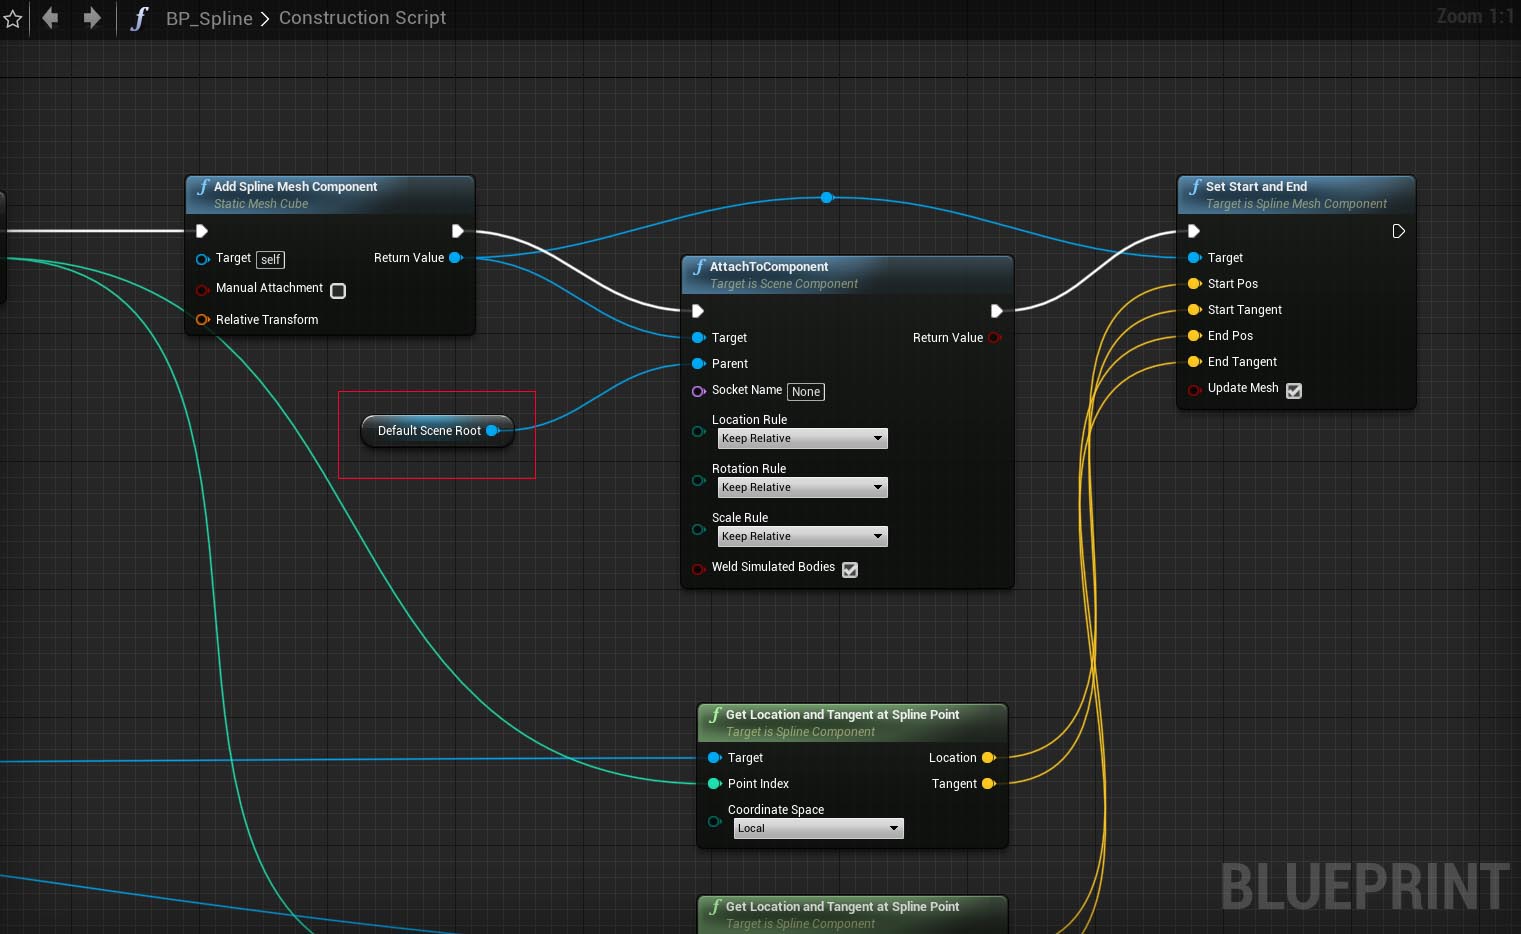
Finally, we want to drop in the ‘Attach to Component’ node and the ‘Set Start and End’ node. You’ll need to drag off the return value on the ‘Add Spline Mesh Component’ node to access Set Start and end in case it doesn’t pull up when you right click.
We’ll use the ‘DefaultSceneRoot’ as our parent for the ‘Attach to Component’ node, which maintains the actor’s primary location/rotation in the game world, with the ‘return value’ from the ‘Spline Mesh Component’ going into the target pin. The values from the ‘Get Location’ and ‘Tangent’ nodes go into the ‘Set Start’ and ‘End’ node as discussed earlier, and that’s it.
Now that we have our completed spline blueprint we can place it in the world and start drawing out our path. To do this, place your blueprint in the world, and click the small white dot. You can now move this around and place this point anywhere in the scene. If you hold alt and drag, you will create a new spline point. Continue this process until you’ve laid out the path you want.
Closing
In conclusion, we learned how to make a base path mesh, a basic spline blueprint, and we created a small scene that made the path the shining feature. If you’re working on a realistic road, you could extend this blueprint by scattering assets (debris, leaves, dirt patch decals, etc.) and decals at random locations on top of your base mesh.
We’ll be going deeper into such behaviors in the future, and how you can fully leverage Blueprint’s powerful procedural placement system to create scenes faster than ever.
I hope you’ve enjoyed this tutorial, and don’t forget to tune in for our livestream today Friday 6th December at 7PM CET!